Part 7 - Install and Configure the Node Tracker
- ultimateblockage
- Johncarlo Maddalena
- Allan Dumaine
- Nathan Bode (Unlicensed)
- Clone the Node Tracker software
- Configure zen.conf
- Run the tracker and check your node on the tracking website
| Description | Command | |
|---|---|---|
| 1 | Install npm, upgrading it to the stable release | sudo apt-get install npm -y && sudo npm install -g n && sudo n stable The above may fail on some Debian 10/11 instances, in such cases, use the following to install npm and node js sudo apt-get install -y nodejs sudo npm install -g n && sudo n stable |
| 2 | Change directory (cd) to the user's home directory and clone the Node Tracker software | cd ~/ && git clone https://github.com/HorizenOfficial/nodetracker.git |
| 3 | Change directory (cd) to where the software has been cloned | cd nodetracker |
| 4 | Install the Node Tracker with npm | npm install |
| 5 | Locate your node's public IPv4 and/or IPv6 address(es) and append them to the zen.conf file as external IP address(es) connected over port 9033 (default) SUPER NODES ARE REQUIRED TO PERFORM EVERY COMMAND IN THIS STEP NOTE: Replace <IPv4> with the public IPv4 of your node, remove <brackets> NOTE: Replace <IPv6> with the public IPv6 of your node in compressed notation without leading zeros, remove <brackets> Use the following link to ensure your IPv6 address is in compressed notation: | Create environmental variables for IPv4 IPV4=<IPv4> Append external IPv4 into zen.conf echo "externalip=$IPV4" >> ~/.zen/zen.conf Create environmental variables for IPv6 IPV6=<IPv6> Append external IPv6 into zen.conf echo "externalip=$IPV6" >> ~/.zen/zen.conf Append port into zen.conf echo "port=9033" >> ~/.zen/zen.conf |
| 6 | Restart zend and check the address configuration NOTE: The output of the 2nd command should display the address(es) entered in the previous step | zen-cli stop && sleep 8 && zend && sleep 30 zen-cli getnetworkinfo | grep address |
| 7 | Configure the tracker by running the setup process, for this you will need the following details
| node setup.js |
| 8 | Now test the Node Tracker installation and configuration | node app.js |
| 9 | Leave the Node Tracker running in your terminal and check the status of your node on the tracking website, use the search box and enter the FQDN of your node https://supernodes.zensystem.io/nodes/all << Super Nodes Select your node and check the following values (top left of the detail page) are true and up respectively - example shown to the right NOTE: The tracking server validates certificates in batches, you may only see a State of "up" and a Cert Valid of "not checked" or "false not found" until the tracking server runs a batch of certificate checks. You can proceed with further steps without waiting for a Cert Valid of "true" | 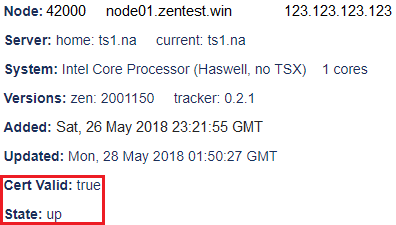 |
| 10 | If your node displays on the tracking site with "state: up", exit the tracker by pressing CTRL + c and continue to part 9 |
![]()
![]()
![]()
![]()
![]()
© 2020 Horizen. All rights reserved.