Part 2 - Login / Creating a non-root user
The next step varies based on your chosen setup, we assume you have an SSH daemon running and either:
- Have a non-root user already established on your VPS (by default when the VPS image was provisioned)
- Have a non-root user created as part of your OS installation
- Have root access to your VPS, or OS (installed on VM, or dedicated hardware)
In both of the first two scenarios above, where you have a non-root user to access your node, steps 1 - 7 can be skipped
| Description | Command | |
|---|---|---|
Login - if you already have a non-root user you can skip to step 8 or 9 | ||
| 1 | On Mac OS, or Linux open a Terminal session and login to your node, replace <FQDN> with your own Fully-Qualified Domain Name, remove <brackets>
NOTE: Upon first sign on, you will be asked to add an ECDSA fingerprint, answer yes NOTE: Upon first sign on with root, it may be necessary to change the root password | ssh root@<FQDN> Example Output > ssh root@node01.zentest.win |
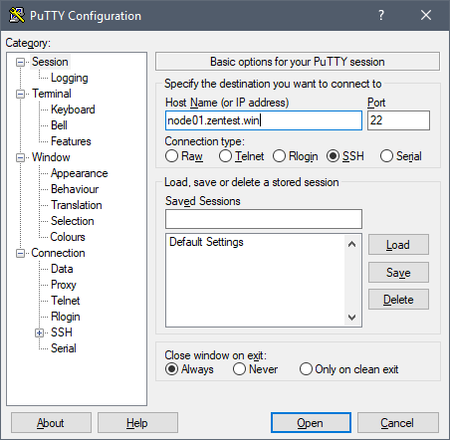
| 2 | If you're using Windows 7 64-bit and newer, launch PuTTY, enter the Fully-Qualified Domain Name of your node into the "Host Name" field
NOTE: Upon first sign on, you will be asked to add an ECDSA fingerprint, answer yes NOTE: Upon first sign on with root, it may be necessary to change the root password PuTTY download (external link) - https://the.earth.li/~sgtatham/putty/latest/w64/putty-64bit-0.72-installer.msi | |
Add a non-root user on your node | ||
| 3 | Some lite installations of linux do not have sudo installed by default, we need to set that up before proceeding | apt-get install sudo |
| 4 | Set a $USERNAME environment variable - change the value of 'zenops' to your preferred username | USERNAME=zenops |
| 5 | Add a non-root user, adding to the 'adm', 'systemd-journal' and 'sudo' group as part of this command
| Do not replace fields starting with $, like the following; it is meant to be copied and pasted without edits NOTE: Windows users on PuTTY terminal can paste by simply right clicking into an open space within the terminal useradd -m -s /bin/bash -G adm,systemd-journal,sudo $USERNAME && passwd $USERNAME If you fail to enter the same password for the confirmation, use the following command to update your password passwd $USERNAME |
| 6 | Switch (su) to the new user that has been created. The remainder of the guide will be conducted using the non-root user. | su $USERNAME |
| 7 | Change directory (cd) to the non-root user's home directory | cd ~/ You can proceed to Part 3, do not follow other steps that do not apply to your configuration |
Already have a non-root user (therefore skipped steps 1 - 7) SSH into your node, these steps can be skipped if you completed steps 1 - 7 | ||
| 8 | On Mac OS, or Linux open a Terminal session and login to your node, replace <USER> with your non-root username and <FQDN> with your own Fully-Qualified Domain Name, remove <brackets>
NOTE: Upon first sign on, you will be asked to add an ECDSA fingerprint, answer yes | ssh <USER>@<FQDN> Example Output > ssh zenops@node01.zentest.win |
| 9 | If you're using Windows 7 64-bit and newer, launch PuTTY, enter the Fully-Qualified Domain Name of your node into the "Host Name" field
NOTE: Upon first sign on, you will be asked to add an ECDSA fingerprint, answer yes PuTTY download (external link) - https://the.earth.li/~sgtatham/putty/latest/w64/putty-64bit-0.70-installer.msi | |
Give your non-root user group permissions (applicable to step 8 or 9 above) DO NOT PERFORM THESE STEPS IF YOU FOLLOWED STEPS 1 - 7! | ||
| 10 | Switch to your root login and enter the root password when prompted | su root |
| 11 | Some lite installations of linux do not have sudo installed by default, we need to set that up before proceeding | apt-get install sudo |
| 12 | Set a $USERNAME environment variable - change the value of 'zenops' to your non-root username | USERNAME=zenops |
| 13 | Modify the non-root user, adding to the 'adm', 'systemd-journal' and 'sudo' group as part of this command
| Do not replace fields starting with $, like the following; it is meant to be copied and pasted without edits NOTE: Windows users on PuTTY terminal can paste by simply right clicking into an open space within the terminal usermod -a -G adm,systemd-journal,sudo $USERNAME If you fail to enter the same password for the confirmation, use the following command to update your password passwd $USERNAME |
| 14 | Switch to your non-root user login and enter your password when prompted | su $USERNAME |


